On The Rails
On The Rails
This was a big job, where a lot has happened, be it good or bad.
I haven't kept this to a simple check list but have presented it as more of a story. You will find plenty of other people who have carried out similar modifications, to different platforms, in mildly different ways so please excuse the slightly rambling narrative as I try to build on this and hopefully entertain along the way. I have tried to put headers at pertinent points to help you get to where you want to be if you are looking for a particular piece of information. Otherwise I hope you enjoy the ride.
I haven't kept this to a simple check list but have presented it as more of a story. You will find plenty of other people who have carried out similar modifications, to different platforms, in mildly different ways so please excuse the slightly rambling narrative as I try to build on this and hopefully entertain along the way. I have tried to put headers at pertinent points to help you get to where you want to be if you are looking for a particular piece of information. Otherwise I hope you enjoy the ride.
From the top
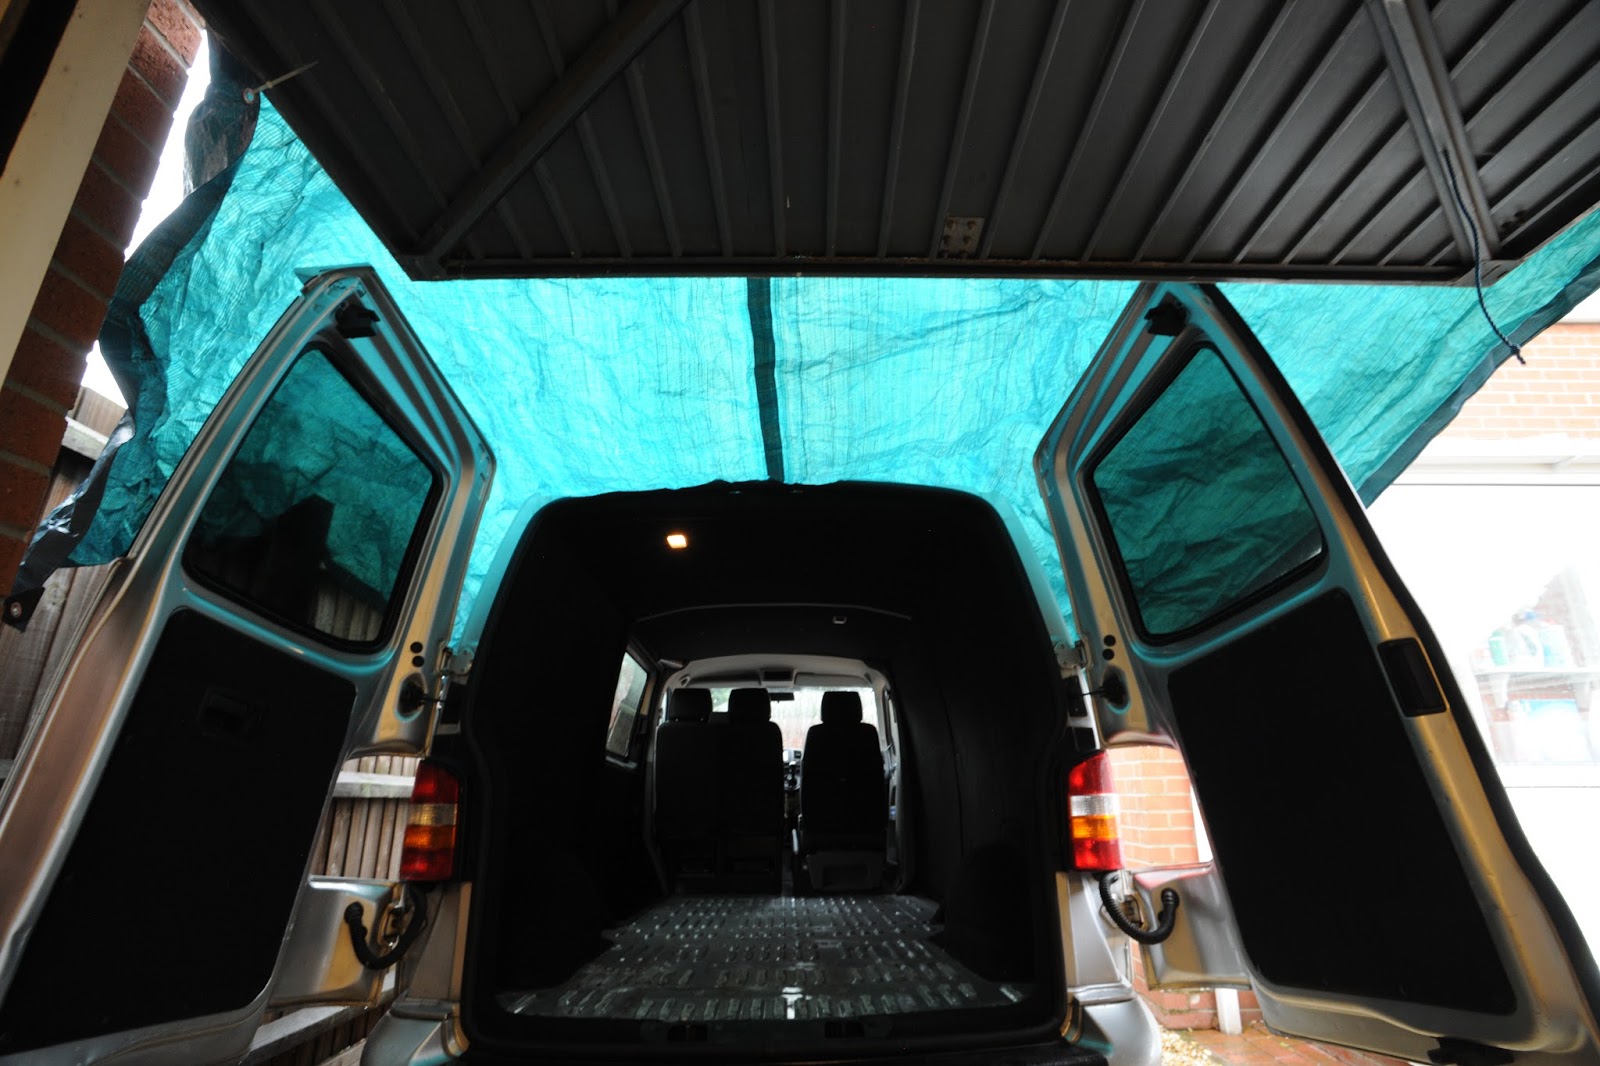
 I bought the van with a fairly nice day van interior that you can see over on the right.
It comprised of an OEM leather tripple folding bench seat from a Executive Shuttle, properly mounted and a table shaped like a surfboard.
 The chequer pattern floor was made of vinyl tiles and the walls were fully insulated and carpeted as individual panels which made for a pretty good quality build.
Unfortunately it did not lend itself well to taking larger loads such as my motorcycles. It was possible to remove the bench seat and use the mounting points as tie down points but this was never going to do as a permanent solution. This was made worse by the vinyl tiles moving whenever a heavy cross load was applied such as a motorcycle side stand.
I also had a desire to be able to fit a rock and roll bed so I could use my van for some light camping and as a place to rest after race meets.
So I knew that things were going to have to change. A plan would be needed.
The Plan
My needs were:
I ran through a number of plans which basically split into two main categorise:
- Have a day van where I could relax after sports.
- Be able to transport both people and cargo comprising mostly of motorcycles or mountain bikes.
- still be able to use the van as a daily run around.
- If possible also be able to fit a rock and roll bed.
I ran through a number of plans which basically split into two main categorise:
No rails
Rails
Adding rails makes the whole van more versatile. Things can be moved around more easily or removed all together depending on my needs.
Different rail solutions come with different benefits.
VW Rails can be fitted to allow the use of the rock and roll bed from a Caravelle for that factory look along with other accessories. They do not however offer any load points so I would still need tie downs for motorcycles. They also cost a fortune, as does the bed. Similar alternatives are available from other vans but these were generally very short of rail length.
Unwin Rails are used in disabled vehicles and ambulances. They allow for loads to be put wherever you want, quickly and easily. There are also seat mounts designed to fit them. The down side is that there is no rock and roll bed designed to fit them and all of the seats designed to go on Unwin rails are terribly ugly.
Highbrid
Did I say two? well I could always have a mix of the above right?
I could fit a couple of Unwin rails for load tie downs but retain the old Shuttle bus seat mounts giving me the best of both worlds. I still however wouldn't be able to fit a rock and roll bed and the floor would be very busy with various mounts.
Narrowing things down
I was pretty sold on Unwin rails even if I had no idea what I would do about a seat.
Unwin rails come in two flavours: Surface and low profile which you can see below.


The surface mount (left) sits on the ply flooring which the bolts pass through making fitting a lot easier.
The low profile however sits in a channel making it much neater but conversely more difficult fit.
I opted for low profile as; not only does it look better but it will make moving about the van easier as well as loading/ unloading bikes. I found a company who would sell full 3 meter rails and ordered three of them with all of the fittings.
It took a long while to decide on what seat I would use but I finally decided to buy a rock and roll bed from Captain seat on eBay. This then made me take even longer choosing a 2/3rds width seat over a full size so I had the option for a kitchen unit; more on that later.
The seat needed to be preordered so if you decide to do similar, make sure you get this part ordered well in advance.
I had read a lot into the seat mounts for unwin rails and opted for a pair of HAL seat mounts. These would probably need to be bolstered by more mounting supports as the bed is big and heavy but I decided to stick with two for now and see how things went.
I had read a lot into the seat mounts for unwin rails and opted for a pair of HAL seat mounts. These would probably need to be bolstered by more mounting supports as the bed is big and heavy but I decided to stick with two for now and see how things went.
With a seat width known I knew roughly where I would need rails: One close to the left edge, one right of centre and one on the right edge. The third rail would only be used for loads and maybe for the kitchen unit; more on that later..
As I was not keeping the original bench seat I would need to remove the mounts and replace the wooden floor to fill in the gaps. I bought three large 9mm ply sheets ((Th)9mm (W)1220mm (L)2440mm) from B&Q to replace the whole floor area. Annoyingly their largest sheets are not quite wide enough to fit length ways so there is a lot of wastage. I also needed to buy something to cut the new boards into shape. I ended up getting a Ryobi 500w jigsaw which proved to be a vary capable tool.
Finally I had to get a new floor covering. I did a fair bit of reading up on forums and settled on Altro flooring as a tough (if expensive) alternative to lino. As it happens eBay is a great source for off cuts of this industrial grade flooring and I managed to get a large enough sheet for about the cost of a meter new!
Lets get stripping

Once everything was ready and I had some free time I went about stripping out the old interior. The floor mount trims were held in with self tapping screws, as was the floor boards them selves. To get to them I had to remove every floor tile individually which left a layer of sticky adhesive. this was great to walk on when you have a gravel drive, causing you to take it with you whenever you stepped out of the van.
The wooden floor panels came up with little argument once I had found all of the screws leaving me with the floor mounts for the bench seat and a lot of human slime.
I took the time here to give everything a good clean first with a hoover and then with a mop and bucket. There was some no more nails on some of the rear flooring which I left all but the loose bits as it wasn't hurting anyone.
Where the wooden floor had been fitted with self tapping screws there were a lot of holes. I decided to give these a coat of paint to help preserve the metal floor. This would be more important for any holes I didn't end up using again in the future.
Measuring up

I had a few problems trying to measure up as the back of the van is a pretty irregular shape. I had to keep a certain distance away from the left wall as the sliding door pillar would get in the way when I opened the bed. It was also clear that the irregular shape of the floor itself would limit my choices for fitting the low profile rails if they were to sit properly.
After much faffing I finally decided to go for the closest risen part of the floor to my nominal measurement for the left rail, then measured the width of the bed frame out from there.
When I say the width of the bed frame I am saying centre to centre of the L section of the bed frame as that is where the bolts would pass through into the rail mounts. As the L section is 40mm wide I had some fudge factor available to me but it was imperative that the rails were perfectly parallel or I wouldn't be able to move the seat forward and back on the rail.
As for the third rail; I just had to stick it in where it would look right and sit well so opted for the mirror of the left side.
For all three rails I carefully measured to allow for the end stops and a little land for the floor board so it wouldn't be too fragile. Once I had this done and all of the rails were lined up I used a marker pen to mark each hole I would need to drill through the vans floor.
Going down under
Before drilling could commence I would need to gain access to the underside of the van to make sure I wasn't drilling into anything important.I jacked the back of the van up and stuck it on axle stands. Then I had the great fun job of removing all of the shielding.
This stuff is held in by spring clips and self tapping screws with the odd bolt here and there too. There is also a hand brake cable, spare tyre and an exhaust in the way too. All of this had to come out and might I suggest you stick some goggles on whilst doing this as there is a lot of rust and dirt ready to fall into your eyes as you work. Luckily as most of the screws go into plastic grommets, I didn't have too much trouble with broken fasteners even if they were a bit rusty. Plenty of WD40 and an impact driver saw me through.
All of these shields needed a good wash before refitting which was mostly done by the rain during my work.
Drilling

I started drilling with a 2mm pilot drill on the centre line of the van, periodically checking under the van to make sure I wasn't drilling into anything I didn't want to.
For any areas I wasn't sure about I used the drilling guide to stop me drilling any further than the 3mm thick floor plate. Turns out I didn't need to do this but it's not a bad thing to be cautious. If you don't have a stop on your drill you can tape your drill bit as a guide.
I worked my way along, skipping any cross sections that pass under the van as I didn't need to use every hole in the rail anyway. Unwin suggest a minimum of every other bolt hole so I was going well over this. You can easily spot these box sections from the inside as you can see the rows of spot weld circles through the paint.
Once this was done I started on the right hand side and quickly saw I was perfectly lined up with the box section rail. This was helpful in some respects as it would prevent me drilling into anything important but on the down side I would need to drill access holes for fitting nuts and washers to the underside.
I had to skip the rear axle brace which was four holes in a row so made sure I heavily supported the areas around this with solid rows of bolt holes.
Finally I did the same for the left safe in the knowledge that I had no danger of drilling into the tank due to the box section. It wasn't long before I had a fully pilot drilled floor.
I then went about expanding the holes to 5mm then onto a final 8mm taking care to stay centred on my markers.
This is a short paragraph but it took me bloody ages! No less so due to slowly blunting drill bits and being too stingy to replace them.
Drop the tank
Now I needed to get under everything so the tank had to go. The Haynes manual for the T5 gets this process dead right so I had no problems releasing the cap, removing the straps on the tank and lowering the tank on a hydraulic jack. As my fuel tank was only an eighth full it wasn't too heavy to manouver onto the floor where it could be nudged about a bit to gain access to different areas.
Once the fuel cooler and hoses are disconnected they will leak a little but nothing too scary.
Drilling some more
There were a couple of points where there were already lightening holes which I simply expanded with a cone grinder to be big enough for a socket.
As you can see from the picture, the weather had turned wet so I had to get inventive to keep myself and my tools dry as I worked but I did eventually get the drilling finished.
Once all of the holes were drilled I tidied up, cleaned up the holes where needed and gave everything a few coats of paint.
Cutting a jigsaw
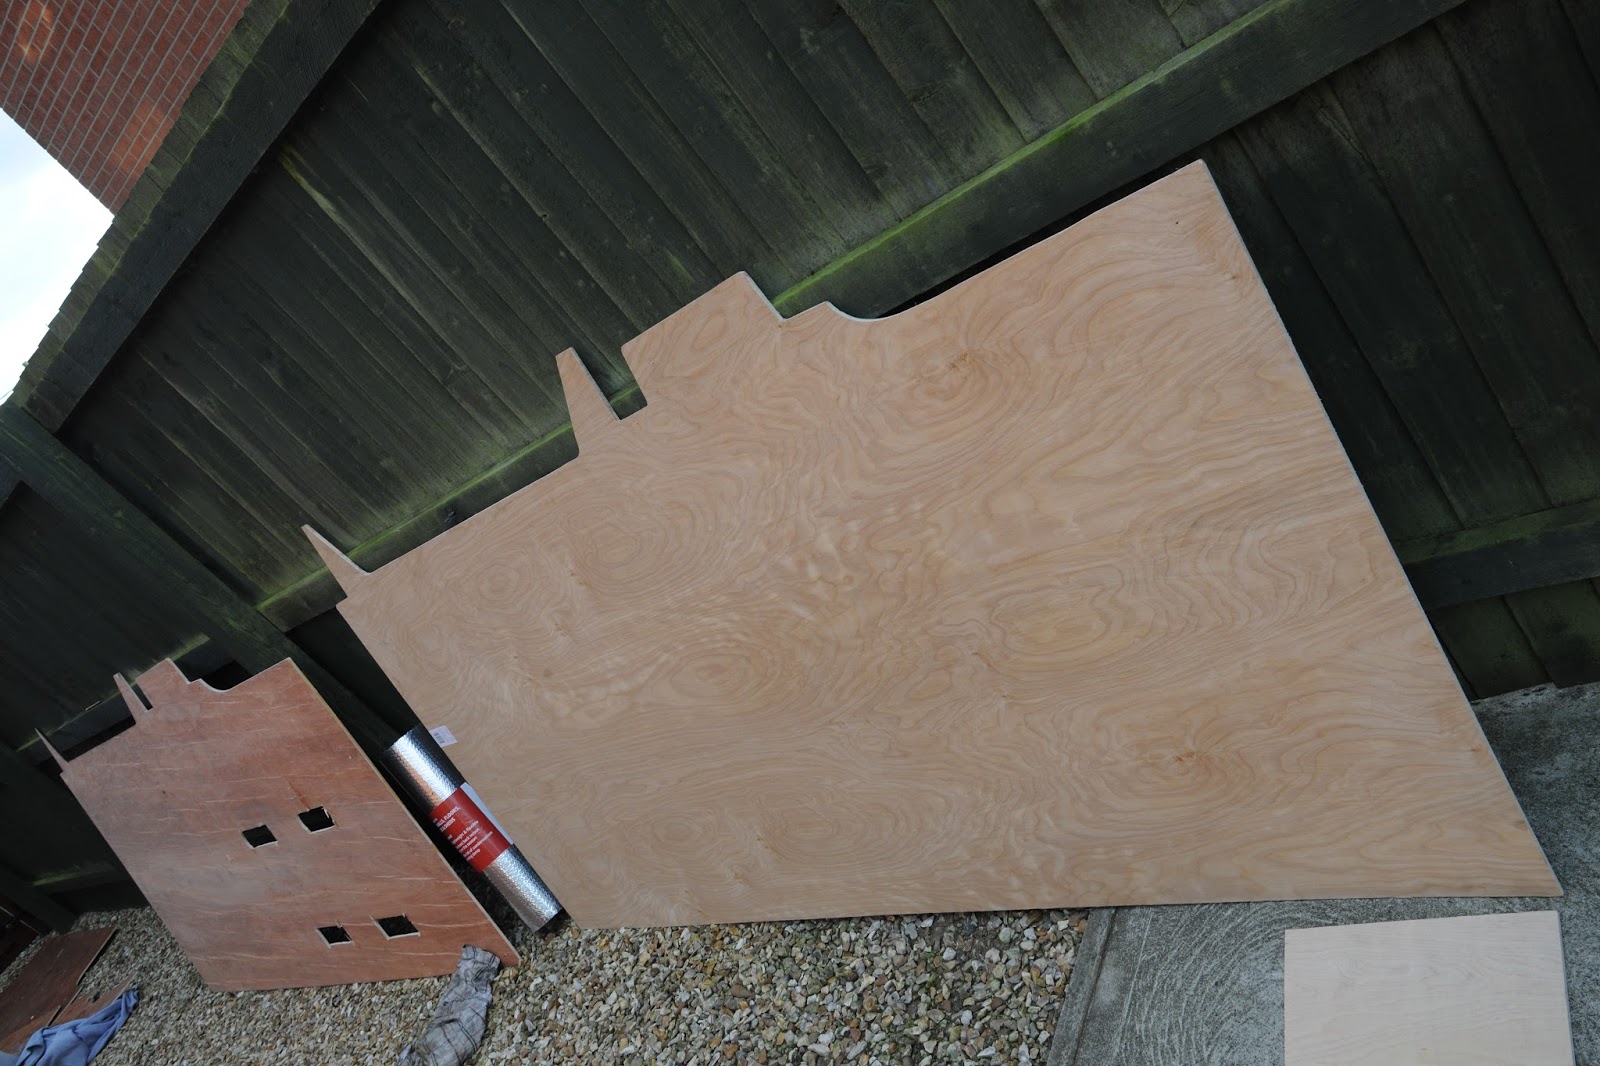 Shortly after removing the wooden flooring panels I realised I would only need to replace the one big panel that the seat mounts passed through. I traced the outline onto a new board and cut it out using the jigsaw.
The jigsaw holds a straight line very well but struggles with tight bends,
I found the best way to deal with this was to cut in from the edge at a different angle and chip away at it. The very narrow bit by the sliding door pillar was achieved by drilling a hole big enough for the blade then cutting across for that short length.
I did a quick test fit of the new board which fitted well. I then picked up a number of the holes that the self tapping screws would pass through into the vans floor. Not all of these lined up later as things shift about but it was still worth while as I didn't need to drill as many fresh holes.
 Now I knew where the floor rails would go I could measure where the cut outs would be on the floor boards.
I loosely fitted them and marked where the centre of the ends of the rails would be on the ends of the boards. I could then draw a line for each rail and measure out the thickness of the recessed area of the rail. Finally I measured in from the edge the land area I had left myself from the edge of the panel to where the end stops would be mounted.
With this marked out I was able to cut the wooden panels. I cut the smaller back panel first and could see it would be substantially weakened, making it hard to move around. I braced it with off cuts of wood temporally so I could move it around and chose to do the others later after I had cut the Altro flooring.
cutting the Altro
 Before I cut the larger boards rails I cut the Altro vinyl flooring.
I laid the flooring out upside down then placed the floor boards on top (also upside down) as you can see on the right.
I then traced the outside with a pencil before removing the boards and cutting out the shape with a fresh Stanley knife blade.
One area I would change here would be to change my blade more often. They are not expensidve and as the blade blunts I had to use more pressure which would invitably lead to the blade wondering off of it's line. Using fresher blades would result in a cleaner cut making for a less messy finish.
It still came out okay though and doing it upside down ment that any slight blade wonderings that happened on the first score through didn't show up on the top which was a bonus.
Finally fitting it all
 With everything prepped I was ready to fit everything to the van
I started with a final clean up of the floor area taking care to remove all swarf from drilling and to paint over any holes I had made.
I ended up just painting in lines over the rail holes as I wasn't going to see this floor again and the protection would be helpful for a longer living van.
 Next I used some spray on contact adhesive on the floor before laying down layers of aluminium coated bubble wrap insulation.
I bought this stuff from B&Q which was only a tenner a role which did the whole van.
This needed some pressure to keep it down but it did mostly stick.

Next in went the floor boards. I popped the rails in with loose bolts to help line everything up as best I could. For this I had to poke holes in the insulation with a scribe before posting the bolts through. At this point I noticed the right rail slot was a bit off but I hoped bolting the rail down would squash things into place. I then screwed the boards in using the left over self tapping screws from the removal. Finally I removed the rails ready for the next step.
 Another coat of adhesive was laid down, this time on the wooden floor boards. then the Altro was laid down on top of this.
I then placed every heavy tool, bricks and whatever else was handy on top of this and left it over night to set.
Again this wasn't perfect and I might reglue this with carpet glue in the future if it lifts off. Any bits that didn't glue the first time I managed to lift and reglue later.
Bolting in the rails
Fitting the rails is a two person job.I placed the rails in with all of the bolts dropped into place. I then had my partner inside the van with an allen bit in a ratchet handle whilst I fitted the nuts and washers underneath with an impact gun. I made sure to take a number of different sockets and extension bars to help with different situations. Thankfully I only had to use a ratchet handle underneath twice for holes that were too small and off line for the impact guns socket to get a grip on.
We tightened a nut on either end and the middle of each rail first to help align things and prevent bowing.
We then fitted the rest of the nuts and washers to the centre rail first as that is the easiest followed by the right then the left.
Getting the nut on was easy with a single depth socket and extension bar before using the double depth socket on the impact gun to drive them home.
Washers were another matter however. On the left and right rail the access holes in the box section were too small for the washers to be popped in. to get the washers where I needed them I had to post the washers in from the box sections long drainage slots then flick them down the box section to my waiting finger at the access hole. I quickly got this technique down and made things a bit more fun for me at least.
Once all of the nuts were in and tightened I was able to get an idea for how well things were going.
The rails were all sitting a bit uncomfortably except for the centre which was looking pretty much perfect. I was a little worried at first but thankfully noticed that some of the bolts were loose. Clearly as the rails were getting tightened down, previously tightened bolts were becoming loose as the rails bedded down.
Tightening these up made things a lot better. Care has to be taken here as any holes that pass through parts of the floor that are not risen shouldn't be tightened as much or you will bend the rail. It's easy to get carried away with the impact gun so try to keep an eye on what the floor is doing from underneath.
The finishing touch of the end stops followed with a self tapping screw each. The taper on the counter sinking is very high here so I would suggest buying some 45 degree counter sunk screws here as normal countersunk screws sit poorly.
Rock and roll


I carefully measured the distance between the rail centres and transposed this to the bed which was bang in the middle. This seemed to be a good thing till I noticed this would put the bolts too close to the box L section.
I had a nightmare drilling through the L section as I had to do it with the frame hanging out of the van (it's just too heavy to be moving about) and my drill bits were very blunt by now.
I bolted the rail mounts to the back of the frame. They only just fit and was far too tight for space to use washers under the nuts. Another learning point for the future would be to take this into account! I did however succeed in the end and the bed slotted into the rails nicely. The bed needed a locating peg in the front made from a stack of washers on a long bolt. This was carefully measured so it would drop into a hole on the rail, supporting the front of the bed.
Moving the bed around requires the HAL mount to be opened as you can see on the right image above, then the bed is tilted back and rolled along the rail. The Hal mount is very tight to close in some positions which hints to the rails still not quite being flat but this will be something to fiddle with later.
Wrap up
With the floor done I had to restore the rest of the van to the road.
Heat and weather shielding, the hand brake cable and the exhaust were all replaced.
Whilst fitting the weather shield the back of the centre rail I spotted the bolts would interfere with its fit so had to grind these down. Not too bad a job when you have an air grinder and why not get the camera involved for some time lapse video?

 Whilst removing the exhaust I had noticed it wasn't looking its best so had decided to buy a nicer replacement.
This wasn't too bad a job and a job halved by getting it done now whilst the old one was off anyway. I will write another blog entry for that later but here is a sneak peak of the quad tip stainless setup I have now.
Conclusion
That's it. not a lot to say for around a weeks worth of evenings on top of a couple of days graft. It wasn't an easy job but was also far from actually being hard. More labour and time intensive.
I would do a fair bit differently as mentioned throughout this little story. A drill bit sharpener is now on my shopping list! I am however happy with my results; save for that wonky right rail slot that never quite sorted itself out.
I haven't got round to a finished job photograph yet as I was straight out to the super bike school on my GSXR400 the following day then away with work straight after. I will get some photographs soon though don't you worry.
For the time being here is a picture of the van set up for load carrying and ready to hit the track. Thanks for reading. I hope this will be of some help to you, feel free to comment below to help others should they wish to do the same.

Oh and what of the kitchen unit I mentioned? More on that later...


Hi! Great writeup. Looking to do the same as you but can't find the right bed (with angle pieces on the base). Can you fix/repost the link to where you got yours?
ReplyDeleteCheers,
James
Thanks for highlighting the broken link.
DeleteI have fixed it but here is the link to Captain seats eBay page:
http://www.ebay.co.uk/usr/captainseat?_trksid=p2047675.l2559
Hi, just wondered which rock and roll bed you were able to pair with the Unwin rails?
ReplyDeleteJamie
I bought it from some chaps in Melton Mowbry. I can' remember their name off the top of my head. they were on eBay but have direct contact details.
DeleteHi Gavin, I'm awaiting arrival of my rails and Hal seat mount and after trying to find info out for the past couple of weeks I've just somehow stumbled over your blog. Really interesting and useful. Set up looks great !
ReplyDeleteI have a question if you are able to anwser, I'm trying to find out the spacing between the three fixing points on the Hal mounts so I can advise my bed guy where to weld me an additional plate onto the bed.
Do you know these dimensions or able to check on yours for me ?
Even the guys at unwin couldnt tell me as in this lockdown they cant access all of there info on the database.
And you mention you had to put a peg at the front have you got a picture of this and why it was needed.
Any advise would be amazing...
Thanks Neil..
Hi there. Sorry for the late reply.
DeleteThe Unwin mounting system is not designed for this task and is really stretching its abilities with a big unit like this.
The front peg is to support the forward corners. I used a long M10 bolt with a stack of washers held in place with a nut. If I had kept this setup, I would have used a single point Unwin mount. This would have taken longer to shift the bed but it would be far more secure.
I found there was space enough to fit the Unwin mounts inside the L section of my bed but if I did it again, I would place them more outboard to give me more room to adjust them so they match the rails perfectly.
hi Gavin. great blog. And the finished job looks perfect. i’m looking to do the same. I have a few questions.
ReplyDeleteDo the captains bed come with the “L” plates as standard ?
How do you find the r r bed? was the 3/4 the best option?
How many holes did you drill into the chassis rails?
Did you utilise the front peg on the mounts , or was this deleted ? and you just used the one you made up?
Appreciate your time , David.
Everything is as described here.
DeleteI drilled every hole I could as patterned by the rail. I only missed areas such as the rear suspension location as I wouldn't be able to put a nut on the back.
The R&R bed is from a place in Melton Mulberry, 2/4 suits my needs with the bike as I needed the gap. personal preference I suppose.
Yes I kept the front peg for location. Ideally I would have replaced this with a butterfly mount but never got round to it.
Hello thanks for sharing this it's really helpful! Do you think 2 HAL fixings were enough on a rock and roll bed? Looking at some of Unwin's other fixings like the t-bar, some people use 4. Just wondering if you think it feels safe enough with 2, or if you found any content about this? Thanks
ReplyDeleteI always wanted to go back and add a proper fixing to the front of the seat like the T-bar. Similar fittings are used on aircraft seats which are subjected to much higher loads, conversely they are lighter. I believe this setup with a T bolt in the front would be sufficient.
DeleteA refined hub for people building smarter strategies and stronger outcomes.
ReplyDeletePanel Mount
Expert driven intelligence for professionals steering modern industry change.
ReplyDeleteDIN Rails