Getting a handle on the handling.

Intro
I bought this van with a rather pimp set of Rangerover Stormer wheels and a set of V-maxx coil overs helping the van drag its belly everywhere.This all looked very bloody cool but the van handled like crap with a tendency to bottom out over sharp bumps then proceed to bounce its way down the road as the dampening failed to keep the springs under control. This would result in various items removing themselves from compartments and in extreme cases bits of trim jumping off of the van to join the party sliding about my van floor. This was more noticeable from the front end. The back, with less weight on it, seemed better behaved.
Work with what you got


Next up, when I had the van up on jacks, I raise the ride height of the van on the front. As it turns out this was set so low that there was no preload on the spring at all leaving the spring to rattle around when there was no weight on the strut. This means that there was probably only a inch of dampener rod travel at best when weight was on.
I raised the front end up till I started to feel tension against the spring. This raised the front end a tiny bit but immediately stopped the thing from bottoming out as easily. A few more turns later on resulted in the ride height you see here and if I wasn't picky, I would be quite happy with it all. On normal roads, driving sensibly, it is fine and still looks pretty cool to go with it.
I am picky however.
Well that might be a bit blunt. I do live in the country and those back roads can get a bit lumpy so I need something that can handle a few bumps without wanting to induce sea sickness.
Wheels

I knew that my big pimp 20's were holding me back. Big wheels with skinny rubber make shocks work harder and lets not beat about the bush: those shocks weren't the best when they were new!
I managed to get a set of 18's with rubber for £200 of eBay but whoever had them last had some serious tracking issues as two of the tyres were totally hammered on the inside quarter of the crown. They were however decent looking and the extra tyre side wall would help the shocks deal with the road a bit better by removing the smaller bumps.The poor tyre wear was the least of my problems however; as after a good clean with wonder wheels I found out that one of the wheels had a huge weld on the inside rim. This was not as advertised so I returned the (now nice and clean) wheels to the seller who was apparently oblivious to the damage.
I didn't order another set of wheels for a while due to other commitments. Then something else came up.
Shocking
I had some spare cash kicking about at the same time as a company on ebay reduced some KW ST coilovers to a little over £600. Now,; I had been looking at getting some Bilsteins but at roughly double the price I was intrigued by the KW offerings.
All of the reviews I had read seemed favourable and talking to some car mates gave me similar positive responses.
Put simply: the KW's are good, the Bilsteins are a bit better and at that price its difficult to justify if you aren't exactly racing.
After much procrastination I finally bought a set which arrived a week later.
Fitting
I didn't get round to fitting the coilovers for a few months as I had a lot of work to do on my RD250 but finally the day did come when I dragged my van down the side of the house and got stuck into this, no doubt, dirty job.
The back
 Like a book I started this job from the back...
The rear end setup is fairly simple and self explanitary to remove and install.
For those unsure; there is a guide in the T5 haynes manual.
One trick I would suggest with anything like this is to go round the night before with a can of WD40 or similar penetrating oil and get all of the nuts and bolts well soaked to help you out the following day.
A long brake bar and an impact gun came in very handy throughout this job.
 The impact gun was the tool of choice, then when it wouldn't fit, out came the brake bar and spanners. Nothing on the back end was overly tight but a nice set of long spanners would have been the icing on the cake to make this part of the job a breeze.
The damper rods are freed by removing a nut and bolt at either end. With them off, the hub can drop allowing the rear spring to almost come out.
I'm sure that with a little persuasion the spring would have popped out but using a pair of spring compressors saved any "gentle persuasion" with a hammer being required.
Use of an impact gun was helpful for winding the compressors down where access allowed. Of course care must be taken not to over load a single compressor to the other. Also care should be taken when fitting spring compressors to the new spring so that they don't fowl other suspension parts during fitting.

With the old spring out the preload adjuster drops out with it.
As you can see on the right the Vmaxx and KW preload adjusters are very similar.
The KW unit uses small grub screw to lock onto the spring support under the van rather than try to use a second C spanner like the Vmaxx unit which makes the KW unit far less fiddly once fitted. It also makes fitting easier as the preloader isn't free to move whilst fitting/removing the spring.

Side by side the KW dampers look pretty basic with no damping adjustment available.
The large stanchion cover also looks pretty stock and unexciting but the plus side of it is that everything should be well protected so preventing leaks.
Fitting was the reverse on the removal. I reused the bolts and added the washer to the top of the dampener which you can see tie wrapped on in the picture.
All torque settings were found in the Haynes manual and bolts were copper greased.
Front
With the back done fairly quickly I spun the van round (the joys of a small concrete apron on an otherwise gravel drive) so I could jack the front up. I stuck axle stands in, under the engine supports then removed the wheels.
 Load was taken off of the sway bar with a jack on the disk (be very careful this doesn't slip off) and the sway bars removed with a spanner and allen key. Well I got one off. The top bolt on my near side sway bar rounded off on me leaving me trying a number of removal techniques before giving in as it was only stuck on the shock which I was replacing later anyway.
With the bearing housing free of fastenings and hoses unclipped it is a simple case of sliding it off of the bottom of the shock.
Hahah it's never that easy!
A good soak of WD40 and an absolute battering with a lump hammer later and it was off.
Its worth mentioning that the brake pad wiring and hoses are at a lot of risk here from getting twatted with a hammer or getting caught up and ripped out whilst removing the bearing housing so keep an eye on them.
The leg can now be unbolted from the top and lowered out of the van.
Access to the top nut is behind a panel behind the battery and airbox for their respective sides.
My off side stantion spun which required holding to remove the top nut but otherwise this is fairly straight forward.
Now was a great opportunity to give everything a bit of a clean and paint up in the suspension area. I inspected the various bushings which all looked in fairly good condition. I had considered a full bush upgrade but the cost was very high for these parts for my needs.

Side by side you can see some fairly considerable differences between these shocks.
The KW strut has two springs, one to prevent spring chatter at low load.
Similarly to the back setup; the KW strut was otherwise far simpler looking than the Vmaxx it was replacing. There was no compression screw on top and the preload C nut was plastic.
I wasn't feeling overly confident in my purchase right now with only the positive reviews and the overall newer kit keeping me going with the fit.

The top nut bearing was removed from the old strut, cleaned, inspected, lubed and refitted to the KW strut.
This job is where the spring compressors are normally used but there was so little preload on the Vmaxx springs that I didn't need them. Removing the bearing without spring compressors can be very dangerous so do be 100% sure there is no tension on the springs before trying this unless you want a new vent in your roof or worse...
 I wound the preload up on the KW shock to 7 visible threads below the nut before fitting it into the van.
Again fitting was the reverse of the removal; just with less hammers and the use of a torque wrench.
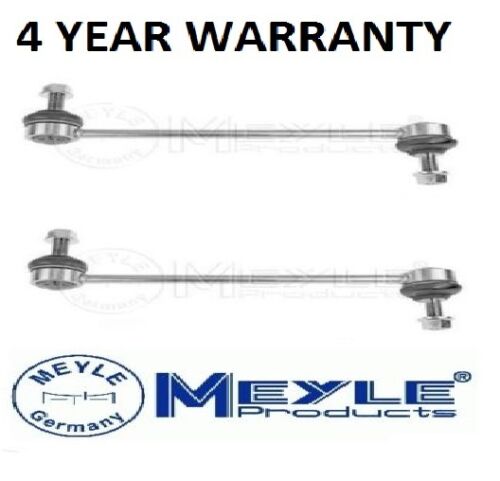
I replace my stock (and now 50% broken) drop links with a nice set of Meyler drop links. They were the same price as OEM and were supposedly better so I thought why not.
THe bolts on the bearing houseing were also replaced as the originals were heavily corroded. A friendly local fastener supplier was very helpful here.
With the work done I lowered the van from its axel stands.
Verdict
She was sitting a touch high for my liking but I knew things would settle over time so I left setting where they were. That aside things weren't particularly mind blowing so far.A road test however would prove to be very eye opening.
I hit the main road from my village and wound the van up to 60 but everything felt very strange.
I couldn't feel a thing.
The van felt like it was floating. Not in a soft way though, I couldn't feel a single ripple in the road.
I turned off onto a notoriously bumpy road and kept the pace on.
Bumps that would have previously removed bodywork at slower speeds were now mild inconveniences and the cornering handling was taught.
These shocks are really good!
Over time I dialled up my sensitivity and got back to feeling the road through my new suspension but still the improvement was dramatic.
Those old Vmaxx shocks were really quite bad in comparison and I am very pleased with this upgrade.
I still intend to change the wheels for something a little smaller. The extra tyre will help remove vibration and reduce the work my shocks are having to do but I am otherwise very happy with the current upgrade.
As for ride height the KW suspension doesn't go as low as the V-maxx for those looking for a belly rubber look but this is not a bad thing for me. I have a long way to go down still should I wish to, however this isn't a show van and the extra ride height makes for better handling which I prefer over looks.


Comments
Post a Comment